
Merging Vendors in Dynamics GP
If you’ve had Dynamics GP for a long time, then you have likely accumulated a long list of vendors. It’s nearly inevitable that there will be some duplication of vendors. This may seem like an innocent enough mistake, but the result is not just a longer list of vendors. In reality this could be a big issue. The simplest issue is time lost sifting through that long list of vendors. It might not seem much, but multiply that by the number of people entering in invoices and the number of invoices entered in each day, and the amount of time lost increases rapidly.
There is also a separate, hidden risk. Imagine having two vendor ID’s for the same vendor. When an invoice comes in, you enter it into one of those two vendors. It’s not uncommon for some vendors to later on send a copy of the invoice, hoping perhaps to get paid sooner. That copy of the invoice might be entered into the second vendor. Keep in mind that Dynamics GP has functionality to prevent duplicate invoice (document) numbers for any one vendor…But NOT if that duplicate invoice number is entered into a different vendor. The result? You may be paying a vendor twice for the same invoice. Some organizations have been known to pay invoices of $10,000 and above twice.
These days Dynamics GP has out of the box functionality to resolve this issue. If you have two vendor ID’s for the same vendor, you can now merge them into one vendor ID. The transaction history will also be merged into one.
The following process is optimal if you have identified various vendors to be merged. If you are only merging two vendors, then you can type in the Vendor ID’s directly into GP.
Step 1 – Prepare a CSV file of the Vendors to be Combined
Most people start with creating an excel file, and then save it as a CSV (comma delimited) file.
The file should have the following columns:
- The existing Vendor ID, from which you will be moving the history from
- The Vendor ID, which you will be moving the transaction history to
Also, make sure to remove the headers from the completed file. In other words, don’t leave the column headings. Dynamics GP will interpret the headings as vendor ID’s that should be merged.
Step 2 – Go to Purchasing Page – Utilities – Vendor Combiner and Modifier
Keep in mind this step can only be done by the “sa” or “DYNSA” user.
First, select the import file, and then click on the “Validate” button. Dynamics GP will make sure that all vendors that you are about to merge have the same currency ID, and it will also confirm that your vendor ID’s actually exist.
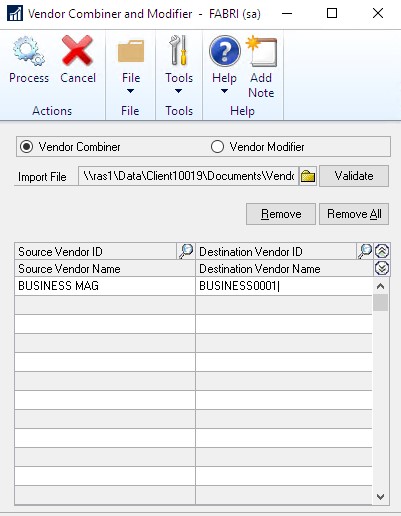
Step 3 – Process your vendor merge
Now you are ready to click on the “Process” button. Once GP has finished processing, the vendors will have merged, as will all transactions.