
Customizing your GP Security to Match Audit Requirements
Background:
Dynamics GP comes with predefined security roles, which is probably a huge sigh of relief for most of us. The sheer volume of windows, reports, and other items that we would otherwise have had set security to can seem overwhelming.
What happens when the “out-of-the-box” security roles that GP provides us with aren’t enough? Whether the needs come from inside, or it’s an auditor who wants you to be more detailed with your security, you need to be ready.
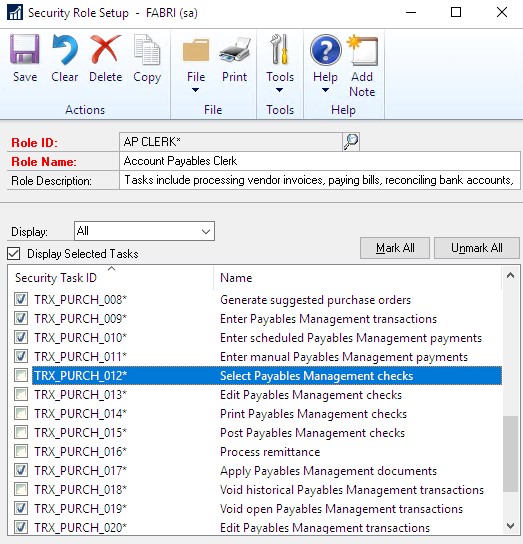
Here’s a great example. Dynamics GP has one single security role for Accounts Payable, called “AP CLERK*”. This security role lets you do any Accounts Payable process, including create vendors, enter in invoices, and make cheque and EFT payments.
Do you see the problem there? Any one person could create a vendor for themselves, enter in an invoice for $1,000,000, and then print themselves a cheque. Next thing you know, that person has retired on a nice Caribbean island somewhere.
Even if you trust your employees completely, that’s not the point. Corporate responsibility and audit requirements demand that you take the appropriate measures to keep your corporation’s data, and money secure.
Let’s use the example that we mentioned before. We have one single security role for Accounts Payable. Let’s make it a goal to split that security role into 3. When we’re done, we want three new security roles.
- AP VENDOR CLERK (for creating and maintaining vendors)
- AP CLERK (for entering in invoices, and other miscellaneous AP processes)
- AP PAYMENTS CLERK (for cheque, and EFT payments)
Creating the “AP VENDOR CLERK” Security Role:
Go to Microsoft Dynamics GP – Tools – Setup – System – Security Roles. Type in the ID of the new security role, along with a name and description. Then all you have to do is scroll down through the list “Security Tasks” until you find the one for maintaining vendors. You can select additional security tasks if you wish, but this does fulfill our initial concept of what the “AP VENDOR CLERK” role will do.

Creating the “AP PAYMENTS VENDOR” Role:
Next let’s set up a similar security role, but this time for printing cheque. You could also include posting cheques, and other tasks within this new role, if you wish. We will call this new security role the “AP PAYMENTS VENDOR”.
Go back to the same window, under Microsoft Dynamics GP – Tools – Setup – System – Security Roles. Then fill out the fields again, and select the appropriate options. In this case we have decided to include not just printing cheques, but a variety of related tasks as well.
Creating the “AP CLERK*” Role:
Finally, we need to take our original security role that came with Dynamics GP, “AP CLERK*”, and modify it to suit our needs. Don’t forget to change the description!
In this case, we have decided to keep it simple. Everything that the two new roles “AP Vendor Clerk”, and “AP Payments Clerk” can do, the old role can not do. Therefore, the old security role is mostly for typing in invoices. The one exception was the security task “Apply Payables Management Documents”. We still want AP Invoice Clerks to apply credit transactions to invoices, so that task seems worth keeping for them.
Now that you’re done customizing these security roles, the only thing left is to assign them to different users. You can do that under Microsoft Dynamics GP – Tools – Setup – System – User Security.
Conclusion:
Accounts Payables tends to be one of the more common areas that auditors tend to focus on. However, you could also be reviewing your security to ensure only the appropriate people can enter in general ledger transactions, or review security around Accounts Receivable payments.
Thanks for reading how to create multiple security roles in Dynamics GP, hopefully now you can confidently meet audit requirements. If you want to stay up-to-date on our latest blog posts and events, make sure to like and follow us on Facebook, Linkedin, and Twitter @GP365.