
How to Conform Cheques to the CPA Date Standards Using Mekorma
Introduction
Cheques follow various standards in different jurisdictions. In Canada, cheques issued need to follow the CPA standards. Some of these standards are minor formatting requests which Mekorma cheques typically already have set as standard.
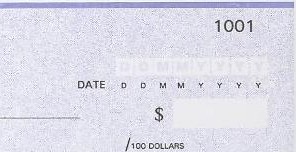
However, there is one standard that can be tricky. In some countries, the cheque date is simply one bunched up set of data, in Canada each digit of the date has to be separated out, and clearly marked. Here’s what that requirement looks like.
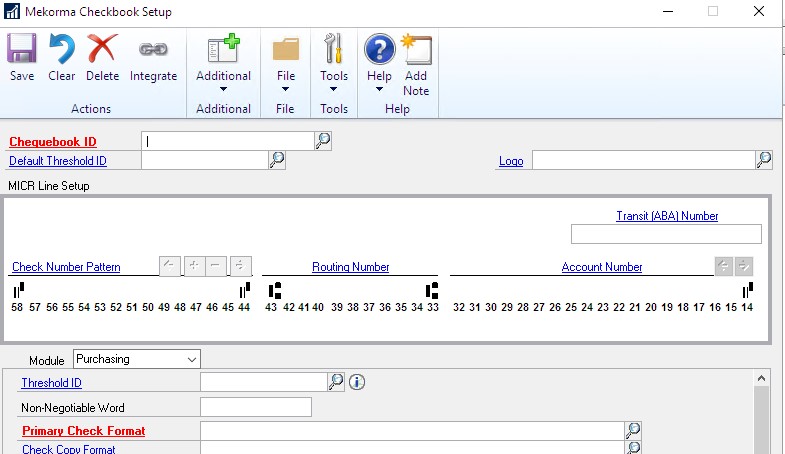
How do you do that? The typical cheque has one single field for the date, which translates to (depending on the format) “Jan 1, 2027”, or maybe “01-01-2027”. Below is what that looks like in Mekorma Configurator. The date is one single field, and you may be left wondering what you are supposed to do with it.

Thankfully, Mekorma realized that this CPA requirement exists. They have created several fields for each character in the date. This is a drastic improvement over what Microsoft offers out of the box using Report Writer. In that program, the fields don’t exist at all, and you must follow a long process using various calculations in order to get that date broken down to the different fields.
Mekorma Cheque Configuration:
Step 1:
Go to the “Mekorma Checkbook Setup” window and select the chequebook you are working on.
- Go to Tools – Setup – Purchasing – Mekorma – Checkbook setup
- Go to the Chequebook ID field, and select your chequebook
Step 2:
If you have already been using Mekorma, you should have a Check Format selected. Drill down on the bold red “Primary Check Format” to see how it has been set up. This will open up the “Mekorma Configurator” program.
Step 3:
Take a look at the check portion of your printout. You may have to scroll down past the cheque stub in order to find it. On the top right of the cheque, you have just one field “Document Date” for the cheque date, you will need to update that.
Click on the “Add Elements” option in the ribbon on the top of your window.
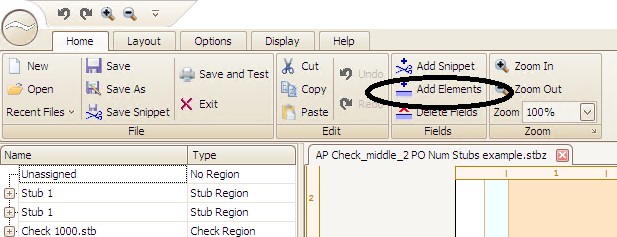
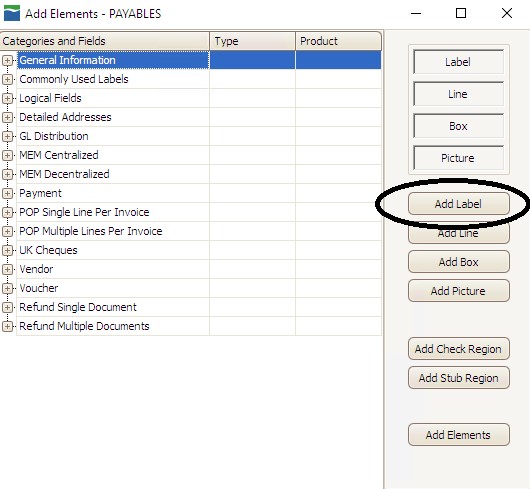
Step 4:
Now that you have opened up the “Add Elements” window, expand “Payment”. You will see that the fields you need will be listed out there individually.
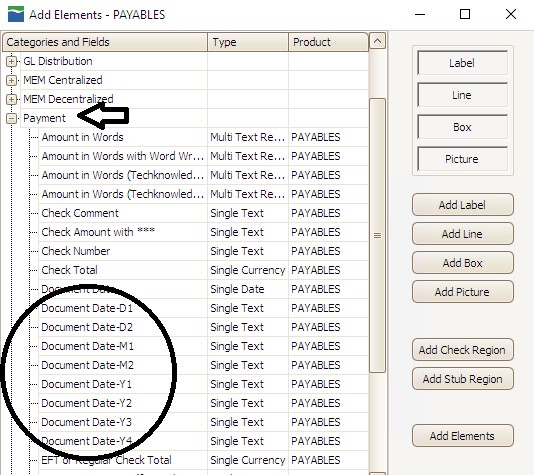
Step 5:
Click on each of the fields you will need and drag them over to the body of the cheque. You can try to put them in the right place right away.
Step 6:
Now that you have the individual fields, you want to spend a few minutes aligning them and putting them in just the right place on your cheque. Go to the “Layout” tab on the top left of your Configurator window to find helpful options to complete this task.
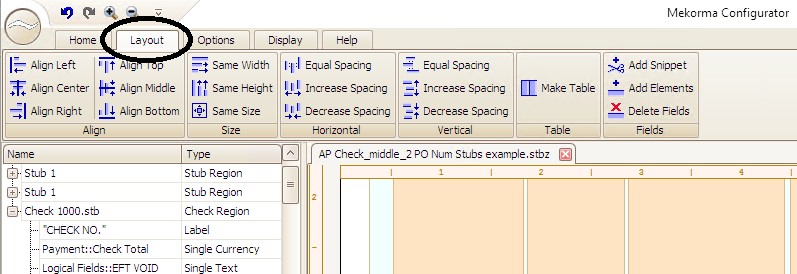
Step 7:
Finally, you still need to add in the labels for each of the fields. This can also be found under the “Add Elements window”. Go back to the Home tab (to the left of the layout tab) and click on “Add Elements. Within that window, go to the right side, and click on the “Add Label” button. You will need 8 labels, so in that case go ahead and click on the button 8 times.
Step 8:
The label fields will show up on the top left of the customization area. They will be one on top of another, so it will look like one field at first.
Your task now is to take each of these labels, resize them and move them underneath the date fields. Use the Layout options we discovered under Step 6.
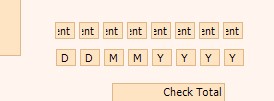
Once done your date should look something like this:

Step 9:
Now that the labels are properly placed, we have to change the text within the labels. Click on each one individually, and then on the left side in the window go to the Property pane, click on the Text line, and type in the appropriate character. Your date should now look like this.
At this stage you should be done. Save your cheque design and close the Configurator. Test print your cheque. If it looks good, you can now pat yourself on the back and enjoy your CPA approved cheques!
Thanks for reading How to Conform Cheques to the CPA Date Standards Using Mekorma, we hope it’s been helpful! If you enjoyed this blog, make sure to like us on Twitter, Facebook, and Linkedin @GP365 to stay up-to-date on our latest blog posts and free training events.