How to Add Dynamic Name and Address Lines on Dynamics GP Cheque Form
Welcome back to another edition of the GP Cheque design series. You can findour cheque design blogs below:
How to Print Cheque Date in MMDDYYYY Format
How to Add Asterisks to the Cheques Field
How to convert Dollar Amounts into Words
How to add additional Tables to the cheque report
Background
It is often the address format of different vendors that are slightly different. Some addresses have extra lines in their address compare to others. It is okay to revers all the line space to make sure all address lines can be printed out and leave the lines as empty space is not required, but that can be an eyesore and look unprofessional. The user-defined function rw_SelectAddrLine in Report Writer is a verify useful function that allows the name and address line to display dynamically without blank lines in between. In today’s blog, we will talk about how to use this function during the cheque design.
Function Parameters
Function name – rw_SelectAddrLine
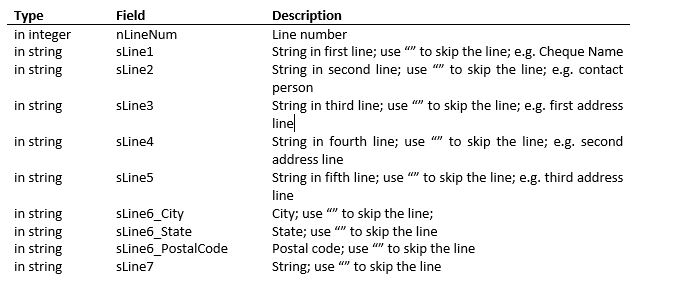
Return the string of name and the address lines for the specified position where blank lines are suppressed. City, State, PostalCode (in SLine6) are combined to be printed on a single line.
How To:
For example, In report writer – Report Layout: Check with Two Stubs on Top, we have already had two calculated fields created, CHQ_NAME_1 and CHQ_NAME_2 to display the first 80 characters of the name in the first line and the remaining characters in the second line. If the cheque name length is less than 80 characters, then the name should be displayed in the first line and followed by the vendor address without any empty lines between. To do so, we will add 5 new calculated fields like below.
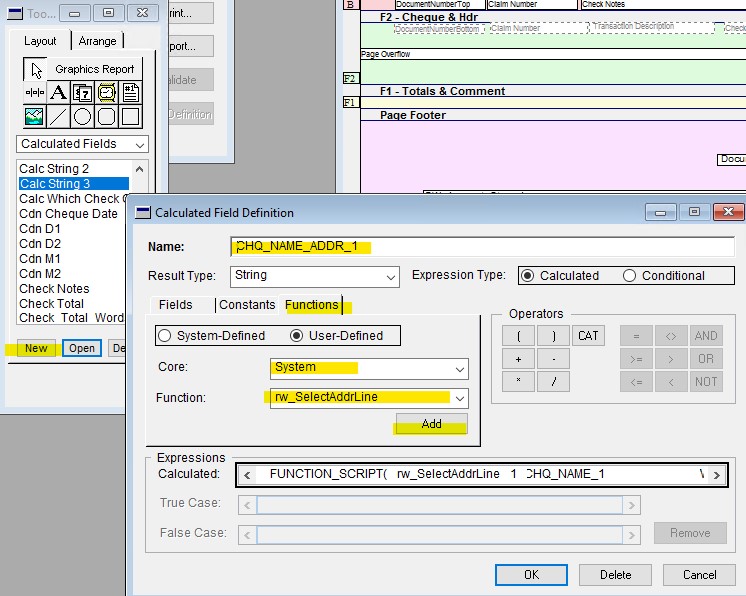
- Click new – Name: CHQ_BANE_ADD_1 – Result Type: String – Functions Tab – User-Defined – Core : System – Function : rw_SelectAddrLine – Add
 2. Then add Fields and Constants to the Expressions Calculated field like below
CHQ_NAME_ADDR_1 = FUNCTION_SCRIPT(rw_SelectAddrLine 1, CHQ_NAME_1, CHQ_NAME_2, PM_Payment_WORK.Address1, PM_Payment_WORK.Address2, PM_Payment_WORK.Address3, PM_Payment_WORK.City, PM_Payment_WORK.State, PM_Payment_WORK.Zip,””)
3. Repeat the steps to have the other 4 CHQ_NAME_ADDR calculated fields added with the below expression
CHQ_NAME_ADDR_2 =FUNCTION_SCRIPT(rw_SelectAddrLine 2, CHQ_NAME_1, CHQ_NAME_2, PM_Payment_WORK.Address1, PM_Payment_WORK.Address2, PM_Payment_WORK.Address3, PM_Payment_WORK.City, PM_Payment_WORK.State, PM_Payment_WORK.Zip,””)
CHQ_NAME_ADDR_3 =FUNCTION_SCRIPT(rw_SelectAddrLine 3, CHQ_NAME_1, CHQ_NAME_2, PM_Payment_WORK.Address1, PM_Payment_WORK.Address2, PM_Payment_WORK.Address3, PM_Payment_WORK.City, PM_Payment_WORK.State, PM_Payment_WORK.Zip,””)
CHQ_NAME_ADDR_4 = FUNCTION_SCRIPT(rw_SelectAddrLine 4, CHQ_NAME_1, CHQ_NAME_2, PM_Payment_WORK.Address1, PM_Payment_WORK.Address2, PM_Payment_WORK.Address3, PM_Payment_WORK.City, PM_Payment_WORK.State, PM_Payment_WORK.Zip,””)
CHQ_NAME_ADDR_5 = FUNCTION_SCRIPT(rw_SelectAddrLine 5, CHQ_NAME_1, CHQ_NAME_2, PM_Payment_WORK.Address1, PM_Payment_WORK.Address2, PM_Payment_WORK.Address3, PM_Payment_WORK.City, PM_Payment_WORK.State, PM_Payment_WORK.Zip,””)
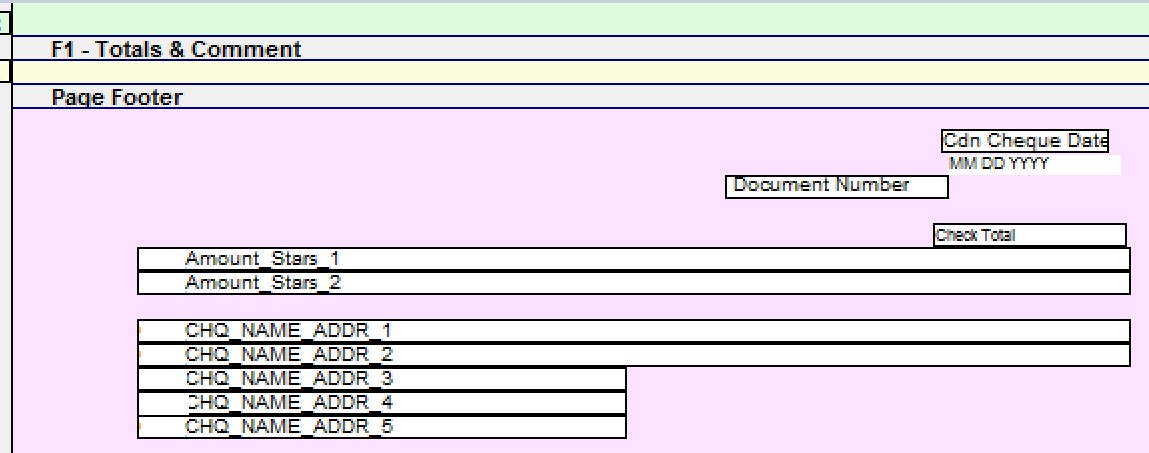
4. Drag the 5 fields to the position on the report layout
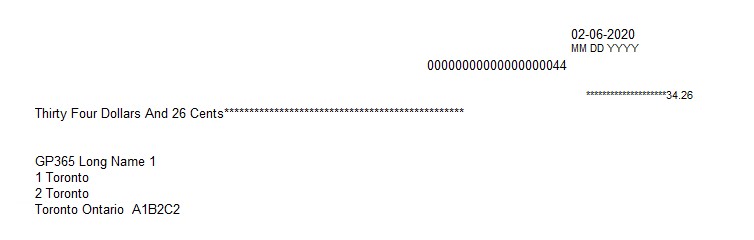
5. This is how it looks like when printed out. If the cheque name is long, it will be broken into two lines
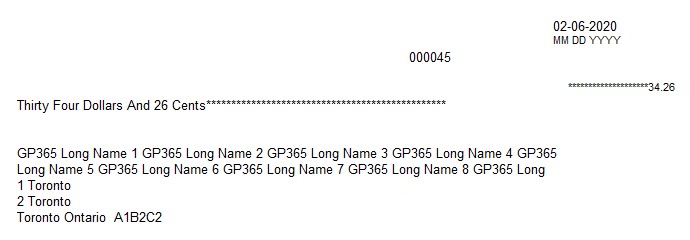
If the cheque name is not that long, it will be displayed in one line and followed by the address lines without space line